One-Off IdP with KeyCloak

When end-2-end testing applications that use an IdP, an IdP needs to be in a known state to make test repeatable.
Typically a container is used, with a configuration that needs to be reset before (and after) a run. Restoring the IdP configuration isn't ideal, since addring new test cases (e.g. adding a user with different properties to check application behavior). I propose a different approach: One-off IdP
Container without persistence
I start with an empty deployment of KeyCloak running in a docker container.
#!/bin/bash
#Run a clean KeyCloak
docker run --rm -p 8080:8080 \
       --name testcloak \
       -e KEYCLOAK_ADMIN=admin \
       -e KEYCLOAK_ADMIN_PASSWORD=password \
       quay.io/keycloak/keycloak:latest start-dev
The --rm parameter ensures that the container is discarded after use. There is no persistence flag (--mount), so when the container goes down, all data perishes (and that's intendet).
Configuration sequence
The empty KeyCloak only knows the realm master and the user admin. To turn it into a fully functional IdP we need to configure it. Since we want this process to be repeatable we shall use Keycloak's REST API. The documentation is complete, including an OpenAPI spec, but in a dictionary style, so all is good when you know what you are looking for. To learn what is needed the browser development tools while using the admin UI teach us the what.
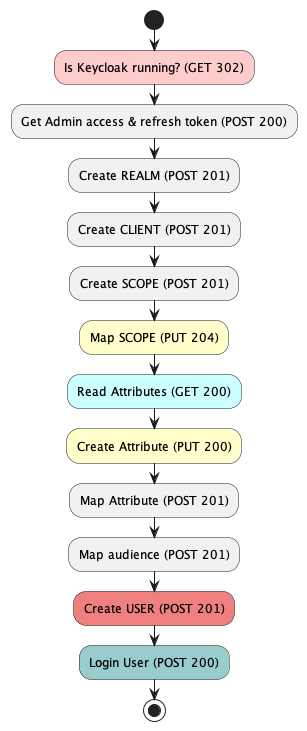
Let's look at them in Detail:
Is Keycloak running? (GET 302)
A simple check if Keycloak is up. In a CD pipeline you would loop a few times when you don't get the 302.
curl 'http://localhost:8080'
Get Admin access & refresh token (POST 200)
Get both the access_token and the refresh_token, Access tokens in Keycloak are, as it should be, very short lived. You might need the refresh URL too
curl 'http://localhost:8080/realms/master/protocol/openid-connect/token' \
--header 'Content-Type: application/x-www-form-urlencoded' \
--data-urlencode 'client_id=admin-cli' \
--data-urlencode 'username=admin' \
--data-urlencode 'password=password' \
--data-urlencode 'grant_type=password'
Refresh access token
curl 'http://localhost:8080/realms/master/protocol/openid-connect/token' \
--header 'Content-Type: application/x-www-form-urlencoded' \
--data-urlencode 'client_id=admin-cli' \
--data-urlencode 'grant_type=refresh_token' \
--data-urlencode 'refresh_token=ey..Cw'
Create REALM (POST 201)
The realm ist the base unit, like the organisation. We create the realm `empire'
curl 'http://localhost:8080/admin/realms' \
--header 'Authorization: Bearer ey..Dg' \
--header 'Content-Type: application/json' \
--data '{
    "id": "empire",
    "realm": "empire",
    "displayName": "Display name for empire",
    "enabled": true,
    "sslRequired": "NONE",
    "registrationAllowed": true,
    "loginWithEmailAllowed": true,
    "duplicateEmailsAllowed": false,
    "resetPasswordAllowed": true,
    "editUsernameAllowed": true,
    "bruteForceProtected": true
}'
Create CLIENT (POST 201)
The client is what defines an application that will request user consent and authenticate to the service provider using the access*token. Our client is called trantor
curl 'http://localhost:8080/admin/realms/empire/clients' \
--header 'Authorization: Bearer ey..Dg' \
--header 'Content-Type: application/json' \
--data '{
    "clientId": "trantor",
    "enabled": true,
    "publicClient": true,
    "directAccessGrantsEnabled": true
}'
Create SCOPE (POST 201)
Each database we want to access is represented by a scope. We need to create and map the scopes to our client. In the URLs we now find unids representing scope & clients
curl 'http://localhost:8080/admin/realms/empire/client-scopes' \
--header 'Authorization: Bearer eyJ..Dg' \
--header 'Content-Type: application/json' \
--data '{
    "name": "approvals",
    "description": "Access to approvals",
    "type": "default",
    "protocol": "openid-connect",
    "attributes": {
        "display.on.consent.screen": "true",
        "consent.screen.text": "Do you want to allow access to approvals",
        "include.in.token.scope": "true"
    }
}'
Map SCOPE (PUT 204)
curl --request PUT 'http://localhost:8080/admin/realms/empire/clients/{{CLIENT_ID}}/default-client-scopes/{{SCOPE_ID}}' \
--header 'Authorization: Bearer ey..Dg' \
--header 'Content-Type: application/json' \
--data '{}'
Read Attributes (GET 200)
Before we can add user attributes like CN, we need to read exisiting attributes
curl 'http://localhost:8080/admin/realms/empire/users/profile' \
--header 'Authorization: Bearer eyJ..Dg'
Create Attribute (PUT 200)
curl --request PUT 'http://localhost:8080/admin/realms/empire/users/profile' \
--header 'Authorization: Bearer ey..Dg' \
--header 'Content-Type: application/json' \
--data '{"attributes":["name":"CN","displayName":"Domino Common Name","permissions":{"edit":["admin"],"view":["user"]},"multivalued":false,"annotations":{},"validations":{}}],"groups":[{"name":"user-metadata","displayHeader":"User metadata","displayDescription":"Attributes, which refer to user metadata"}]}'
Map Attribute (POST 201)
curl 'http://localhost:8080/admin/realms/empire/clients/{{CLIENT_ID}}/protocol-mappers/models' \
--header 'Authorization: Bearer ey..Dg' \
--header 'Content-Type: application/json' \
--data '{
    "protocol": "openid-connect",
    "protocolMapper": "oidc-usermodel-attribute-mapper",
    "name": "DominoCN",
    "config": {
        "claim.name": "CN",
        "jsonType.label": "String",
        "id.token.claim": "true",
        "access.token.claim": "true",
        "lightweight.claim": "false",
        "userinfo.token.claim": "true",
        "introspection.token.claim": "true",
        "user.attribute": "CN"
    }
}'
Map audience (POST 201)
DRAPI wants an audience named Domino, so we add one
curl 'http://localhost:8080/admin/realms/empire/clients/{{CLIENT_ID}}/protocol-mappers/models' \
--header 'Authorization: Bearer ey..Dg' \
--header 'Content-Type: application/json' \
--data '{
    "protocol": "openid-connect",
    "protocolMapper": "oidc-audience-mapper",
    "name": "DominoMapper",
    "config": {
        "included.client.audience": "",
        "included.custom.audience": "Domino",
        "id.token.claim": "false",
        "access.token.claim": "true",
        "lightweight.claim": "false",
        "introspection.token.claim": "true"
    }
}'
Create USER (POST 201)
Finally we can create users
curl 'http://localhost:8080/admin/realms/empire/users' \
--header 'Authorization: Bearer ey..Dg' \
--header 'Content-Type: application/json' \
--data-raw '{
    "requiredActions": [],
    "username": "hariseldon",
    "enabled": true,
    "firstName": "Hari",
    "lastName": "Seldon",
    "email": "hari@foundation.org",
    "emailVerified": true,
    "credentials": [
        {
            "type": "password",
            "value": "password",
            "temporary": false
        }
    ],
    "attributes": {
        "CN": "{{USER_CN}}"
    }
}'
Login User (POST 200)
A succesful user creation will yield an access token one can validate jwt.io
curl 'http://localhost:8080/realms/empire/protocol/openid-connect/token' \
--header 'Content-Type: application/x-www-form-urlencoded' \
--data-urlencode 'grant_type=password' \
--data-urlencode 'username=hariseldon' \
--data-urlencode 'password=password' \
--data-urlencode 'client_id=trantor'
What's next
In a future installment I'll tie everything together in an automation script, one can use in the CI/CD pipeline
As usual YMMV
Posted by Stephan H Wissel on 20 October 2024 | Comments (0) | categories: Curl WebDevelopment