LiveText and HashTags
Without vendor backing, a UN sub committee or never concluding standard consortia the standard for inline tagging has been established. It is the humble hash (or pound) sign: #. There is a bit of wobble if it should be lower or CamelCase, but the consensus on the # tag is universal. Using the Notes client's LiveText capabilities we can put hash tags in our applications or eMail messages to work.
Unfortunately the way to success is blocked by Regular Expressions which are a member of the three occult mysteries of IT ( Map-Reduce and XPath expressions would be the other two). There are approximately 10 people who really understand them: the one who came up with them and the other one is hiding. Luckily there is StackOverflow, the online Regex Tester and SourceForge's Regulator (courtesy of Roy Osherove).
Ideally the regular expression would give us access to the hash tag with and without the leading #. After probing around and testing what I found on StackOverflow I settled with .
.
To put this to use you need to perform 3 steps (you can do them inside the wizard, but we split them out here for greater clarity):
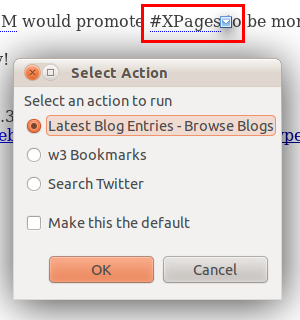
As an example we search for Tweets with that tag.The twitter search includes the hash tag. Let's get started: Crazy brave developers have a look at the XML source code and edit their extra actions in gEdit, notepad, vi or emacs.
Unfortunately the way to success is blocked by Regular Expressions which are a member of the three occult mysteries of IT ( Map-Reduce and XPath expressions would be the other two). There are approximately 10 people who really understand them: the one who came up with them and the other one is hiding. Luckily there is StackOverflow, the online Regex Tester and SourceForge's Regulator (courtesy of Roy Osherove).
Ideally the regular expression would give us access to the hash tag with and without the leading #. After probing around and testing what I found on StackOverflow I settled with
\#([A-Za-z0-9_-]+)(?![A-Za-z0-9_\]-]). One free Starbucks beverage of your choice if you can explain that one in plain English To put this to use you need to perform 3 steps (you can do them inside the wizard, but we split them out here for greater clarity):
- Configure a content type
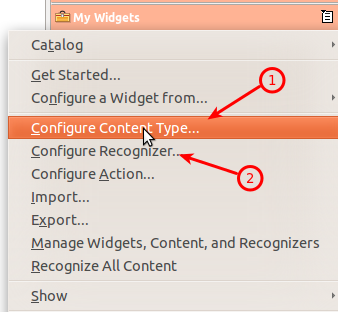
Right click on the "My Widgets" toolbox and select configure Content Type. We will have 2 parts to the content: the full content including the # Tag and the content without it.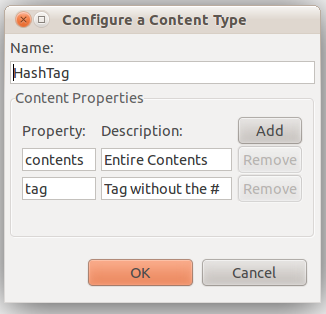
I named the two properties content and tag but you are free to name the second as you deem fit (don't change the first one). Eventually (if I can figure this out) I will add a 3rd property that returns the tag all lower case. - Configure a recognizer
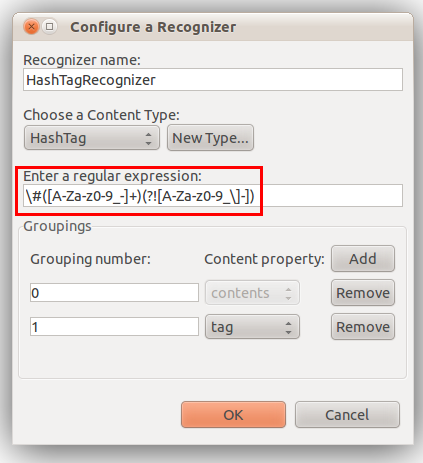
The regular expression is\#([A-Za-z0-9_-]+)(?![A-Za-z0-9_\]-])which roughly translates into: "give me everything that starts with a # and has more than one letter/number/dash in it, return it also without the #. You assign group 0, which stands for "all of it" to content and group 1 to tag". Now we are ready for some action(s) - Configure an action for your content (more about that below)

As an example we search for Tweets with that tag.The twitter search includes the hash tag. Let's get started:
- Click the widget toolbar's toolbox (No widget toolbar? Enable it in the Preferences). You will get the first dialog with the title Start comnfiguring Widgets
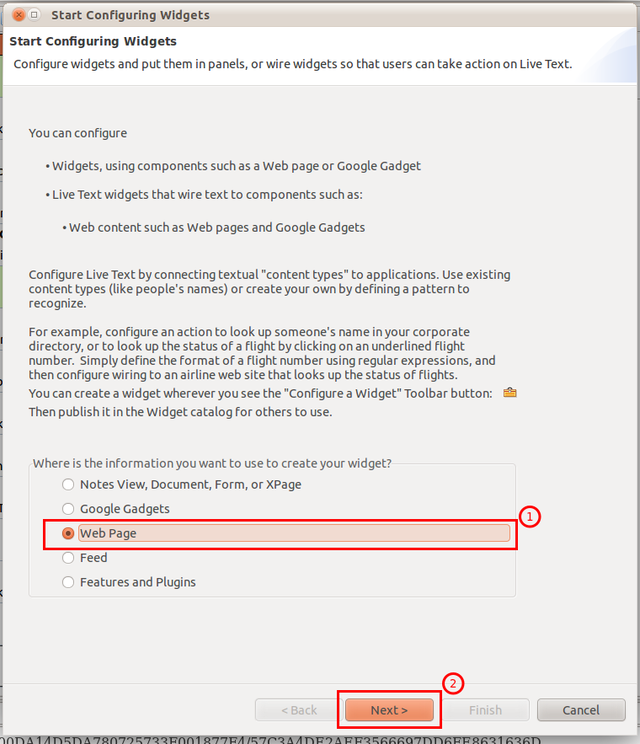
- Select Web Page as Target
- Click on next
- The following dialog is titled "Configure a widget from a Web page"
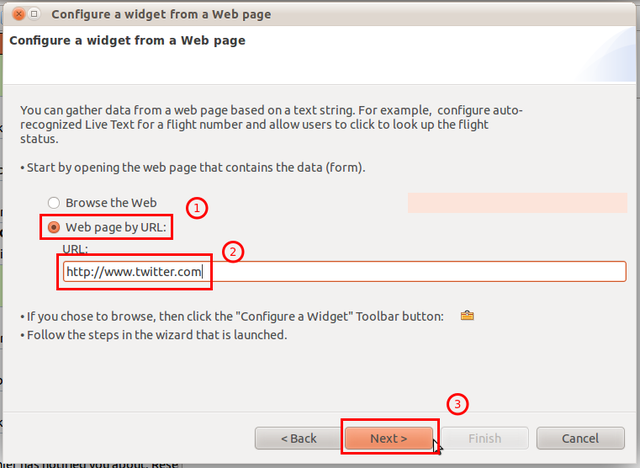
- Select Web page by URL. I find it more convenient just to type/paste the address than to surf with the build in browser only to click the toolbox again
- Our example is
http://www.twitter.com - Click on next
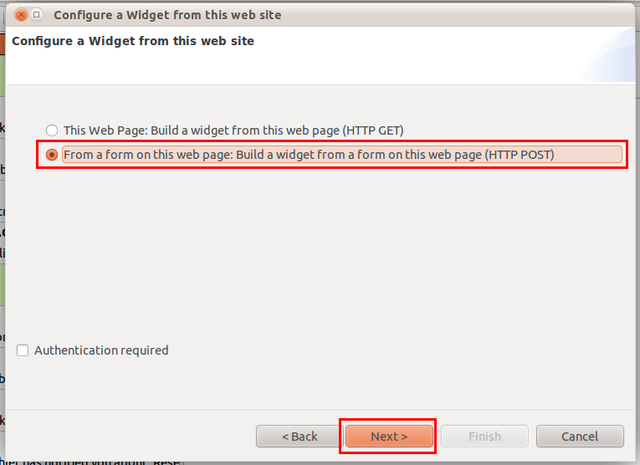
- You need to specify if you are interested in URL parameter (e.g. a Google search) or filling in a form. We select the second option HTTP POST
- The dialog has 3 areas. The first one lists all forms, the middle one shows the page and the lower one has buttons and navigation
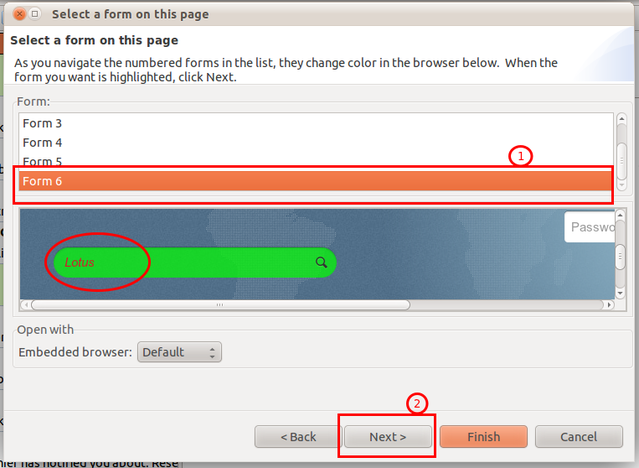
- All forms will be shown in the first box. When you click through the forms the entry fields that belong to that form will be shown in green with the word Lotus in it. For Twitter it is Form 6
- Click on next
- In this wizard step we decide to configure an action, since our recognizer and content type is ready. The twitter search form has only one parameter q, so we don't need the advanced tab.
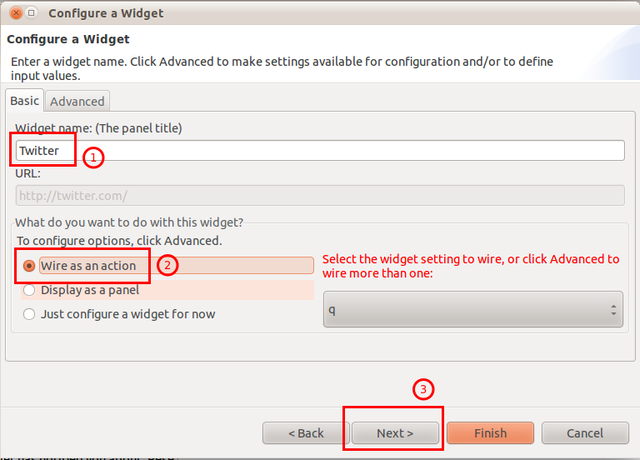
- Give your action a name. Make it short and easy to recognise, that name will later show up in the sidebar and the LiveText menu
- Select Wire as an action
- Click on next
- We almost made it. Now we put everything together
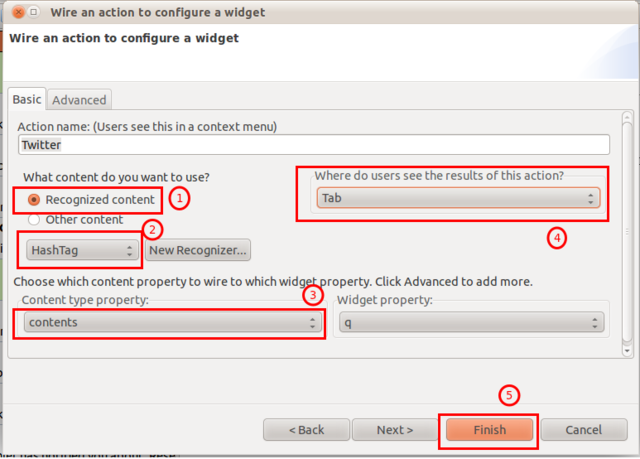
- Select Recognized content
- In the dropdown pick HashTag. We could have configured content type and recognizer here, but then the separation between content, recognizer and action wouldn't have been obvious
- Select contents as source. If you want to search without the leading #, select tag
- It's a personal preference where to open the content. For demos floating windows give the best effect. For real world: I like the tab or (bonus tip) when I target a mobile site so it fits nicely into the sidebar.
- Click on Finish
Posted by Stephan H Wissel on 21 August 2011 | Comments (3) | categories: Show-N-Tell Thursday